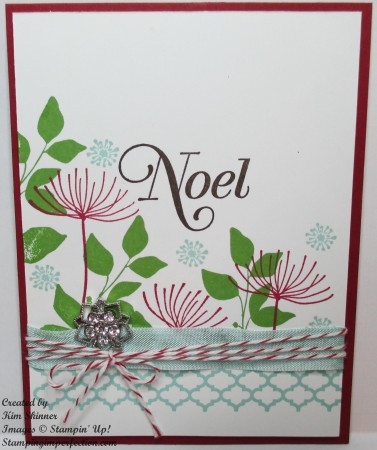
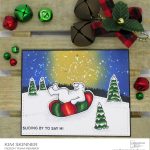
I love when I can take a stamp or a tool and use it in a new way. I like having my stamping tools working harder for me! Don’t you feel like you’re really getting your money’s worth? Today I used the Summer Silhouettes stamp set and created a Christmas card with it. I really love the results here!
I love this stamp set, so to discover how pretty it looks in my favorite Christmas color scheme was a definite win!!! This card was inspired by a card created by my friend Holly K. Her card was an advanced card with lots of layers of all different sizes. I wanted to create my own card that didn’t have a ton of layers and embellishments. This is a beautiful card, but it only has the card base and one layer! I’ve used 3 embellishments and one of them was baker’s twine…one of the most inexpensive embellishments that we can add. Don’t you love baker’s twine? I love adding it on top of the seam binding and attaching a button or embellishment.
I consider this to be a beginner level card because it doesn’t have a lot of layers and details that require a lot of equipment. Does this look like a beginner level card to you? Of course not! It’s pretty! (I even left some white space…aren’t you proud of me? If you’ve been reading my blog for a while, you know how hard that is for me. I’m an empty space filler!)
Card Details:
Materials:
Paper: Cherry Cobbler and Whisper White card stock
Inks: Cherry Cobbler, Gumball Green and Pool Party
Stamp Set: Summer Silhouettes and Greetings of the Season (The greetings are online only…CLICK HERE.)
Accessories: Cherry Cobbler Baker’s Twine, Soft Sky Seam Binding and Frosted Finishes Embellishments.
Tips:
- I stamped the border image in the Pool Party along the bottom of the whisper white mat first. Then I MASKED it. That means I used a sticky note and covered the image so that I could stamp the other images over the top of it, they won’t cover the first image.
- I covered the edge where the border image met the other images with the seam binding and baker’s twine. You can’t see any images that weren’t quite stamped above the sticky note.
- There are no mistakes in stamping! A piece of ribbon, a rhinestone or an embellishment of some sort can cover an amazing number of “oops”!
- Experiment with colors on this stamp set. I’ll be making a fall version of this later in the week. I’m just dying to see what that looks like!
Shop online for your Stampin’ Up! supplies at mystampingstore.com!
All of my October customers should have received an email from me with a link to my Holiday Planner and Organizer Class! This is a thank you gift from me for purchasing your Stampin’ Up! supplies from me during October. Wasn’t it fun to get that box of goodies? I hope that you are enjoying the supplies and the class! Thank you so much!!
Thank you so much for dropping by today!
What everyday stamp or tool have you used in a new way?

