Newsletter April 28

Stamping Imperfection Newsletter
Get ready for Father’s Day with these scrapbooking tips!
Image
Hello

Are you ready for Father’s Day?  A couple of week’s ago, I shared a Mother’s Day scrapbook layout that could easily be turned into a layout for any spring event.  This week, I have a Father’s Day layout that can easily become a graduation layout or a layout for any masculine event!

I have a few scrapbooking tips to share with you in case you are just getting started or perhaps it has been some time since you have created a scrapbook layout!

My layout uses the Amazing Family stamp set that is currently on the retired list and it is available while supplies last at mystampingstore.com.  The background paper and the stamped image both come from products in the Occasions catalog and they are available until June 4, 2014.

Stampin’ Up! has quite a few important dates coming up:

  1. The Occasions Catalog ordering period ends on June 4, 2014.
  2. The Retiring List products are available while supplies last or until June 4, 2014.
  3. The new 2014-2015 Annual Catalog ordering period begins on June 1!  (If you have placed an order with me during the last year, I have ordered one to be sent to you.  Look for it to arrive in mid-May.)  Personally, I can’t wait to see what this year’s In Colors will be!
  4. Becky Higgins Project Life Pocket Scrapbooking is coming to Stampin’ Up!  You can begin ordering those exclusive products on May 1, so stay tuned!
Father’s Day Scrapbook Layout
Image
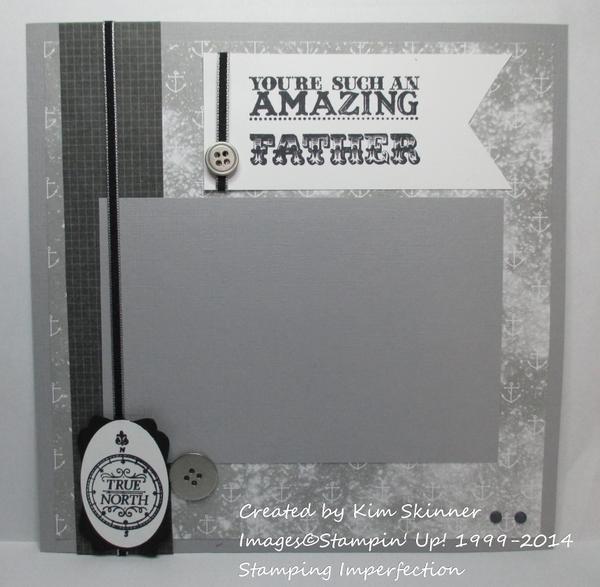
Get ready for Father’s Day by creating your scrapbook page now!  Here is a quick and easy scrapbook layout that will get you ready for that special photo you take on Father’s Day!

Materials:  
o 8 x8″ Smokey Slate Card Stock #131202
o 1-1/2 x 8″ Kaleidoscope Designer Series Paper#132995
o 7-1/2 x 7-1/2″ High Tide Designer Series Paper #132992
o Stamp Sets:  Hello Sailor (# 133275 w, #133278 c) and Amazing Family (#131908 w, #129192 c)
o Basic Metal Buttons #133319
o Basic Black 1/8″ Taffeta Ribbon #119261
o 4 x 6″ Smokey Slate #131202
o Neutrals Candy Dots #130934
o Whisper White card stock #100730: cut one piece cut at 2 x 4-1/2″ and one piece about 2 x 3″
o Extra Large Oval Punch #119859
o Basic Black Card Stock #121045
o Decorative Label Punch #120907
o StazOn Black Ink #101406
o Adhesives

Instructions:

1. Cut all materials to the sizes listed in the materials list.
2. Attach the High Tide Designer Paper to the Smokey Slate card stock with your favorite adhesive.
3. Add the Kaleidoscope Designer Paper strip to the left side of the layout, leaving about ½” of the dsp showing.
4. Add the Smokey Slate mat with your favorite adhesive, layering as shown in the picture.
5. Attach your black taffeta ribbon by wrapping it around the edges and attaching it to the back of the page with glue dots.
6. Stamp your sentiment and images in Black StazOn onto Whisper White.  Create the pennant shape for your sentiment and add the ribbon and button as shown in the picture.  Center this on the dsp area above the Smokey Slate mat.
7. Punch the image with the Extra Large Oval Punch and layer it onto the black Decorative Label mat.  Attach this with dimensionals to the bottom left of your page.  Add a button with a glue dot for decoration.
8. Add two candy dots to the lower right corner and your page is complete!

Stamper’s Lounge Members:  See the video for this layout at http://stamperslounge.com!

Scrapbooking 101:  Tips For Getting Started

There are a lot of computer programs out there to help make the job easier. One program is from Stampin’ Up! My Digital Studio. You can purchase the main program as a disk to upload to your computer. Each month Stampin’ Up! comes out with many more uploads that you can purchase. Maneuvering the program is fairly easy and when you are done, you can send it off to the Stampin’ Up! print shop and have them print your album and ship it back to you. I have been able to create an album in a matter of a few hours using this program.

Personally, I  am more of a Traditional Scrapbooker. I do enjoy attending crafting retreats in order to work on my projects.  Right now I have 100’s of pictures of my children from the time they were born up to today which have yet to be scrapbooked.

The Basic Supplies:  Make sure all of your materials are archival quality:  Acid Free and Lignin Free is a must!

  • Albums and page protectors
  • Card stock and patterned paper
  • Inks and pens
  • Adhesives and glues
  • Scissors and Stampin’ Trimmer
  • A 12 x 12″ container for your pages in progress.

The Nice To Have Supplies:

  • Rubber Stamps
  • Punches and Framelits
  • Embellishments
    • Ribbons
    • Brads
    • Buttons, Rhinestones, Pearls and Candy Dots

Good Advice:  Never use historical or one of a kind photos, with all the scanning abilities out there, ALWAYS use a reprint.   Keep the originals in an archival quality storage box and label them!

Wish I had never:  Purchased all that specialty paper from another company.  It doesn’t match a thing I have, is only one sided and very thin!  Having the Stampin’ Up! Designer Series Paper is a life saver!  The colors blend together so amazingly!  It’s a true pleasure to use on your beautiful pages.

I’ve also discovered that stamping in my albums is much less expensive than buying specialty stickers!

Live and Learn:  Pre-making your pages is a time saver!   I do often wait to mat the pages until I have selected the pictures so the mat color matches the photo size and colors!

Always Be Sure To: Journal.  Whether you journal just the date or write a few paragraphs, journaling is very important to your project.  I love to create  journal “pockets” you put on your page to add that special touch!

Don’t be afraid to write in your own handwriting.  I love seeing my grandmother’s handwriting in the album she created for me.  She wrote all of that just for me!

A Little Goes A Long Way:  Embellishments are wonderful, but don’t overdo them, too many make your page way too busy and bulky.  Think about how they will layer with other pages before you add them!

Layers, Make My Heart Sing:  I love layers!  To me they add a richness that just cannot be accomplished any other way!  Layers of mats add depth, color, patterns, and texture.  You can add textures to these layers by using embossing folders, then by using ink and sponges to add even more depth to it….so much fun!!!

Background stamps are so perfect for base layers as well.  I have a shelf full of background stamps just for my scrapbooks!

If you don’t have the time to make traditional scrapbooks and digital scrapbooking is not your thing, stay tuned for Stampin’ Up!’s Becky Higgins Project Life Pocket Scrapbooking Supplies available on May 1 at mystampingstore.com!

Happy paper crafting!
Kim Skinner
Stampin’ Up! Demonstrator
Check out my blog: https://stampingimperfection.com
kim@stampingimperfection.com
To place an order: http://stampingimperfection.stampinup.net

Leave a Reply

Your email address will not be published. Required fields are marked *

This site uses Akismet to reduce spam. Learn how your comment data is processed.