I love it when I go to the door and there is a craft kit sitting on my porch just waiting for me. Today was that day! The new Simon Says Stamp August Card Kit arrived today and it is another fabulous kit.
These kits never disappoint. This kit has a beautiful background stamp called Modern Flowers, a large stamp set called Mandy’s Flowers, a set of Bo Bunny 6×6″ papers, some card stock, twine, a sheet of Tonic Luxury Embossed paper in a gorgeous blue, a package of Doodlebug enamel shapes and a bottle of Nuvo Crystal Drops.
One of the things I love about these kits is that I can show you a card on my blog that I have created with the kit and while the kits may be sold out, you can still buy the parts of the kit at Simon Says Stamp. If you love the stamp set and papers, you can purchase those.
I don’t like showing cards or projects made from kits that you can’t actually purchase the supplies for. I also love that they don’t retire the products so that if you see this a year from now, you will still be able to get the stamp set.
Let me get to the card:
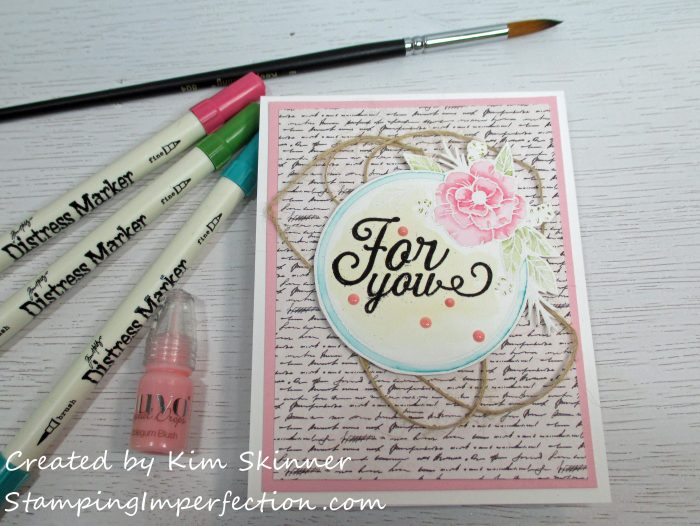
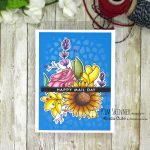
I tried another technique for watercoloring using the Distress Markers. This time I heat embossed the image in white, then I added a little of the Worn Lipstick marker directly to the inside edge of each petal. I then used a wet paint brush to pull the color out toward the edges of the petals so that the inside of each petal is darker and the color lightens out toward the edge of the petals. It’s a quick and easy technique. Yet one more way to use the markers to watercolor.
For the leaves, I used Peeled Paint for the larger leaves and Crushed Olive for the smaller leaves. I added some Peacock Feathers to the circular frame and finished it with some Scattered Straw around the black heat embossed sentiment from the kit. I did this on watercolor paper (Canson XL) and then fussy cut around the image after it dried. I did all the heat embossing before I did any watercoloring.
To add the wash of the straw color around the sentiment, I scribbled the marker onto a clear block and then used my wet paint brush to water down the color and paint it on around the sentiment for a sort of antiquey look.
I used the white card stock from the kit and cut it to 4-1/4 x 11″, scored at 5-1/2″ for the card base. I cut the Cotton Candy card stock from the kit to 4 x 5-1/4″ and then selected this fantastic script paper from the set of 6×6″ papers in the kit. That is cut down to 3-3/4 x 5″. Those are al layered together with my Altenew Permanent Adhesive.
I attached the twine from the kit to the back of my dried image and attached that to the top with foam tape. For the final touch, I added 5 drops of the Nuvo Crystal Drops in Bubblegum Blush that came in the kit. I made sure to walk away and let those dry for about 90 minutes before returning to take my photos.
I love this card! The watercoloring technique with the distress markers was so quick and easy to do. The embossed image acts as a resist and a barrier so that you can watercolor easily inside the image without getting color where you don’t want it. I actually used a fairly big brush (#8 Round) for this project. I like the bigger round brushes because they hold more water and paint or ink. I’ve been practicing a lot so I’m starting to have more control over how much water and ink I actually drop into the image as I’m working. I’m also getting better at making some areas darker and lightening other areas.
Have I mastered the “light source” shading technique…NO! I’ll work on that as soon as I’ve learned to really control where the color is darker and lighter on the image as I color and then I can worry about where it actually should be lighter or darker based on where the light source would be.
This stamp set is so pretty. This is just one of the images and just one of the sentiments. Plus, the kit has that nice big background stamp that I can’t wait to play with next!
So many goodies to play with in one kit! I really loved this one. I’m enjoying the floral images that can be colored in with endless possibilities of techniques. It’s almost hard to decide which technique to use.
Thank you for stopping by today! I hope you have time to be creative and relax today!

