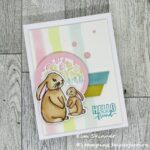
It still doesn’t feel like Spring on Long Island! I decided that my cards needed to feel like Spring, so I am stamping today with Stampin’ Up!s Best of Flowers stamp set!
How pretty is this color combination? It’s so perfect for this time of year. I was so excited when I saw the stamp selections that Stampin’ Up! used in their Best of 25 Years March Stamp Set: Best of Flowers. I actually have 3 out of 4 of the original sets. While this stamp set features flowers from retired sets, the stamped images are about 1/4 of the size of the originals! Of course this was all the excuse that I needed to purchase the new version of these stamps!
I loved playing with the Upsy Daisy and the Hydrangea from my original sets. This set is fun because the images can be used not only as the focal point of the card, but they leave you space to feature one of the beautiful designer series papers or even an embossed background.
Directions for today’s card:
- Whisper White card base cut 5-1/2 x 8-1/2″, scored at 4-1/4″. Pretty in Pink mat cut at 4 x 5-1/4″ and attached with snail.
- I used the Summer Smooches Designer Series Paper (#125409) cut at 1 x 3″ with a Whisper White mat cut at 1-1/8 x 3-1/8″.
- The Thank You sentiment is from Blooming with Kindness (#126422) and cut with my Decorative Label Punch turned sideways (#120907). This is stamped in Old Olive on Whisper White card stock.
- My flower image from the Best of Flowers stamp set (#133342) is stamped in Staz On ink (#101406) and colored with Old Olive, Melon Mambo, Regal Rose, So Saffron, Rich Razzleberry and Elegant Eggplant using my Blender Pens (#102845)
- My image is cut with the second smallest of the Oval Framelits (#129381) framed with a Pretty in Pink mat cut with the oval framelit one size larger. The were cut using my Big Shot (#113439).
- I finished off my card with some Pear Pizzazz ribbon (#125568) from the clearance rack. This was attached to the oval using my multipurpose liquid glue. I attached the entire think to the card base with stampin’ dimensionals.
- I also used 3 rhinestones (#119246) and an Old Olive bow with the new ribbon from the Spring Catalog (#129291).
- One final touch, I used my paper piercing materials to pierce the pink oval mat around my image. (Paper Piercing Pack of templates to match the oval framelits #129387, Paper-piercing tool #126189 and the Stampin’ Pierce Mat #126199).
I created a video of the blender pen technique: (You will see the image from the video on the card that I post on Wednesday!)
Love my cards and videos? You can get more detailed videos with exclusive projects and card ideas by joining my Perfectly Simple Virtual Stamp Club!
When you join the Virtual Stamp Club, you make a $35 or more stamping supply purchase (digital or paper supplies both count!) between the 1st and the 15th of April and I will send you my Virtual Classes for free!!! (You can purchase the online classes for $9.95 separately as well.)
April’s Virtual Classes include:
- A featured technique and a printable technique card. Use these to create a technique binder!
- A 3D project to organize your embellishments or use as a great gift idea!
- A mini scrapbook album that will make a great gift for Mother’s Day, Father’s Day or for a Graduation!
- 4 Bonus Card layouts featuring the Sent with Love Bundle!
Join the Virtual Club today, by clicking here!
Thank you for visiting today!!! I hope you are leaving inspired to be creative!


