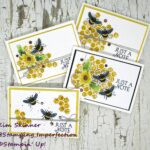
The July Simon Says Stamp Kit is called Bee Yourself and it is a really fun kit.
The kit comes jam packed with a large stamp set, 3 foilable cards, a hexagon die, Honey Bee 6 x 6″ patterned paper pack, black and yellow sequins, 5 Therm O Web Deco Foil sheets, a glue sponge, 4 sheets of card stock and an envelope. I always find the value of these kits to be fantastic and I look forward to getting it each month. It comes with a sheet of ideas from the design team and a lollipop.
I decided to create a “Just Bee-Cause” card to send to my mother with a small gift I thought she might enjoy.
How cute are those little bees? I used my Altenew alcohol markers to color them in, along with the JUST part of the sentiment.
I created a background using my distress oxide ink in salty ocean and the Mini Cloud Edges stencil from MFT stamps. I die cut a rectangle in a piece of the Honey Bee paper from the kit using my MFT STAX dies. The bees are fussy cut out. I just adhered the patterned paper directly to the background clouds and added the bees with foam dots.
The “Just” sentiment actually is not filled in and I decided that I wanted it to pop a bit more.
You can see that the gray markers that I used allow the clouds to show through a bit and the distress oxide ink actually gives the alcohol marker coloring some extra shading. It was interesting to see that the alcohol markers did not completely cover that distress oxide background. It gave the sentiment an interesting look:
I thought that the sequins that came in the kit were a fun finishing touch. These kits often include an embellishment and I always have leftovers to add to my collection of sequins to use on other cards.
I’m working on my alcohol marker shading for little critters like this. I have to work at leaving that white space along the center of the belly to give them a highlight. I always think this makes their little bellies look rounded and it gives the critters dimension. It is a challenge for me to leave some blank white space and I’m never sure that it looks right until I actually complete the card and take a picture.
QUICK TIP:
If you are wondering how something looks to others, snap a picture of it with your phone and look at the picture. That is a perfect method for seeing your card through a different lens, so to speak!
Supply List:
Are you interested in the products I used? To make them easier for you to find, I have linked them below. (Affiliate disclosure ) Your purchases help keep my blog running at no additional cost to you and I thank you for the support!
By the way…the MISTI stamp positioners are 25% off! If you don’t have a stamp positioner, this is the perfect time to cross it off your wish list and treat yourself. I use my Mini Misti the most and I use my Original Misti when I want to do special techniques or anytime I want to hang a stamp off the edge of a card. I use my 12 x 12″ Misti for scrapbooking. I would not recommend the 12 x 12″ Misti unless you are a serious scrapbooker and regularly stamp on 12 x 12″ papers.
I know that there are less expensive stamp positioners out there, but this one is my favorite and the only one I use. I’ve tried the others, but this is my personal favorite. 25% off is a great time to get it! (That’s how I got mine.) I started with the original size and then added the mini to my collection. I purchased the Memory Misti when it went on sale and I had saved money from my mother for my birthday and Christmas. She’s a crafter, so she always appreciates when I use her gifts to purchase a special craft tool that I’ve had on my wish list!
I hope you have a fantastic day. Thank you for spending part of it here with me!


