
You can get the FREE Printable Tutorial for all 4 Fun Folds that I make on Fridays in April! See the details below!
I am not a huge fan of fun fold and interactive cards. They always seem like a lot of work and they are necessarily received with more excitement than a regular card.
However, my sister loves them. That’s all she wants to make.
I went searching for some fun fold cards that I didn’t mind making.
I actually participated in a few virtual retreats over the winter and every single retreat featured at least one fun fold card. Some I really liked. Some were actually ridiculous!
One of the cards had all kinds of crazy scoring and folds and looked like something from The Jetson’s cartoon when we were done. It stood up, but it didn’t open and there was no place to write a message.
I don’t know about you, but I almost never sent a card without writing a heartfelt message to the recipient inside. Why send a card if you have no message for the person you are sending it to?
That card went into my file box under, “Never Make Again”.
Today’s card is a twist on one of the cards I really liked. I made my own version. You can see the card that I made from the retreat on my video below.
I also did a thorough search on Pinterest, YouTube, and Instagram for other versions of the cards that I’m sharing today. There are so many variations of this type of Double Flap Fun Fold. That’s what I’m calling it.
I made two version of the card. Here’s the first one I made:
The focal image sits on a folded piece that opens from left to right. Then there is a smaller flap that opens from right to left. This was very easy to put together!

Here you can see it with the flaps open revealing the inside. If I have a particularly long message to write, this card allows me to add another white panel on the back of that right side flap. I love this!
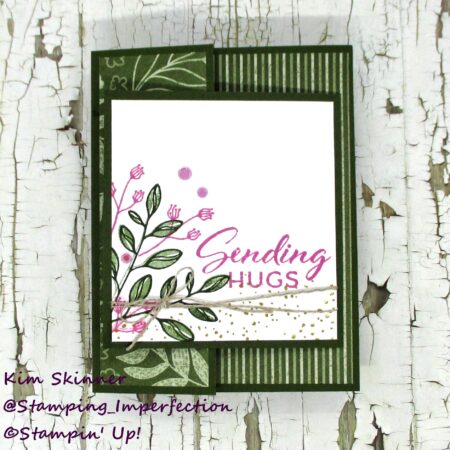
I used the Regal 6 x 6″ Designer Series Paper that is on the Last Chance list right now. I also used the Layering Leaves stamp set, which has since been sold out and retired!
My color combination is Mossy Meadow and Petunia Pop.
This card is made with an almost square focal image panel. When I made my prototype out of scrap paper, I didn’t center that folded panel and I really didn’t like the end result. You definitely want to center that folded panel on the back inside of the card as I have done here.
Here is a second card I made with the same measurements:

The Full of Life bundle was used here. I LOVE this paper. This set of supplies is also on the Last Chance list.
I used Real Red, Blueberry Bushel, Shaded Spruce and Granny Apple Green. I used a piece of that Daffodil Delight ribbon that is also on the Last Chance List.
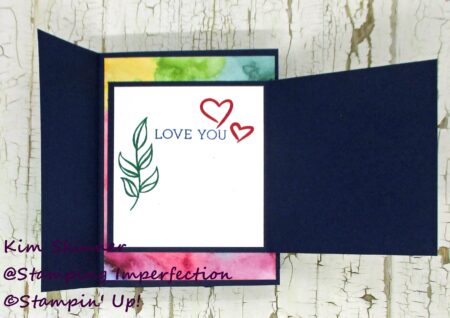
I did a little stamping on the inside of this one too. I’m loving the end result.
My final card uses dimensions on that center piece that I like much better. This is longer and narrower.

This is the Thoughtful Wishes bundle. The paper will continue to be available in the new catalog for 2025-2026, but the stamp set is already sold out and retired!
I used a technique on this card front to ink up that floral stamp. I inked the stamp in Mossy Meadow, then wiped the ink off the flowers with a sponge dauber. I then inked the flowers with another dauber and Petunia Pop ink. I added a little Wild Wheat splatter along the bottom of the panel. The Wild Wheat ink is also retiring and available while supplies last.
Video Tutorial with Measurements:
Product List

")


![Full Of Life 6" X 6" (15.2 X 15.2 Cm) Designer Series Paper [ 163357 ]](https://assets1.tamsnetwork.com/images/EC042017NF/163357s.jpg "Full Of Life 6\" X 6\" (15.2 X 15.2 Cm) Designer Series Paper [ 163357 ]")
![Full Of Life Suite Collection (English) [ 163369 ]](https://assets1.tamsnetwork.com/images/EC042017NF/163369s.jpg "Full Of Life Suite Collection (English) [ 163369 ]")
![Thoughtful Journey Suite Collection (English) [ 163320 ]](https://assets1.tamsnetwork.com/images/EC042017NF/163320s.jpg "Thoughtful Journey Suite Collection (English) [ 163320 ]")
![Thoughtful Journey 6" X 6" (15.2 X 15.2 Cm) Designer Series Paper [ 163303 ]](https://assets1.tamsnetwork.com/images/EC042017NF/163303s.jpg "Thoughtful Journey 6\" X 6\" (15.2 X 15.2 Cm) Designer Series Paper [ 163303 ]")
![Thoughtful Wishes Cling Stamp Set (English) [ 163305 ]](https://assets1.tamsnetwork.com/images/EC042017NF/163305s.jpg "Thoughtful Wishes Cling Stamp Set (English) [ 163305 ]")
![Regals 6" X 6" (15.2 X 15.2 Cm) Designer Series Paper [ 163774 ]](https://assets1.tamsnetwork.com/images/EC042017NF/163774s.jpg "Regals 6\" X 6\" (15.2 X 15.2 Cm) Designer Series Paper [ 163774 ]")
![Mossy Meadow Classic Stampin' Pad [ 147111 ]](https://assets1.tamsnetwork.com/images/EC042017NF/147111s.jpg "Mossy Meadow Classic Stampin' Pad [ 147111 ]")
![Petunia Pop Classic Stampin Pad [ 163811 ]](https://assets1.tamsnetwork.com/images/EC042017NF/163811s.jpg "Petunia Pop Classic Stampin Pad [ 163811 ]")
![Real Red Classic Stampin' Pad [ 147084 ]](https://assets1.tamsnetwork.com/images/EC042017NF/147084s.jpg "Real Red Classic Stampin' Pad [ 147084 ]")
![Blueberry Bushel Classic Stampin' Pad [ 147138 ]](https://assets1.tamsnetwork.com/images/EC042017NF/147138s.jpg "Blueberry Bushel Classic Stampin' Pad [ 147138 ]")
![Daffodil Delight Classic Stampin' Pad [ 147094 ]](https://assets1.tamsnetwork.com/images/EC042017NF/147094s.jpg "Daffodil Delight Classic Stampin' Pad [ 147094 ]")
![Shaded Spruce Classic Stampin' Pad [ 147088 ]](https://assets1.tamsnetwork.com/images/EC042017NF/147088s.jpg "Shaded Spruce Classic Stampin' Pad [ 147088 ]")
![Daffodil Delight 1/8" (3.2 Mm) Satin Ribbon [ 164715 ]](https://assets1.tamsnetwork.com/images/EC042017NF/164715s.jpg "Daffodil Delight 1/8\" (3.2 Mm) Satin Ribbon [ 164715 ]")
![Natural Tones Linen Thread [ 164071 ]](https://assets1.tamsnetwork.com/images/EC042017NF/164071s.jpg "Natural Tones Linen Thread [ 164071 ]")
Thank you for stopping by!
Have a fantastic day!


