Craft Room Storage: Re-Making A Space With Stamp-N-Storage
Looking for ideas to re-make your crafting space? Check out how I’ve gotten started with my craft table using Stamp-N-Storage modules!
Have you been dreaming about a craft room make-over? If you’re anything like me, you got a Pinterest board full of gorgeous craft rooms saved for inspiration!
Personally, I’ve been piecing together storage finds from garage sales, thrift stores, dollar stores and flea markets!
I feel like my organization system, while not pretty, really works well for me. It has been great to experiment with inexpensive finds to really figure out what my craft storage needs really are before spending money on specialized storage pieces.
I have however, been dreaming about a few specific items that keep popping up in the craft spaces that I find myself envying online!
I decided that it was time to treat myself for a change. I’m not talking about completely gutting my room and hiring a contractor to build the perfect space. I’m talking about starting in the area that I use the most and getting a few things to make the space look cleaner and more cohesive while meeting my storage needs.
A couple of items that keep popping up include new ink and punch storage modules. I fell in love with the modules created by Stamp-N-Storage. They have designed pieces specifically for Stampin’ Up! inks and punches that I use exclusively.
There are actually 3 pieces pictured here. The ink storage is the Combo Holder. This holds my ink pads, re-inkers and markers all in one place. On top of the ink storage, you see the Lock Down Punch Holder. I’ve already painted those two pieces! Everything comes unpainted in the natural wood that you see with my clear block holder in the lower left corner. That piece is actually the Marker Nook. I purchased two of these. One will hold my clear blocks and the other will hold my few regular sized ink pads along with aqua pens, jounaling pens and so forth.
I actually purchased the ink Combo Holder and the Lock Down Punch Holder as a Package Deal, which saved me some money. It pays to plan ahead and purchase your pieces at the same time to get those bundle or bulk discounts when you make your purchase.
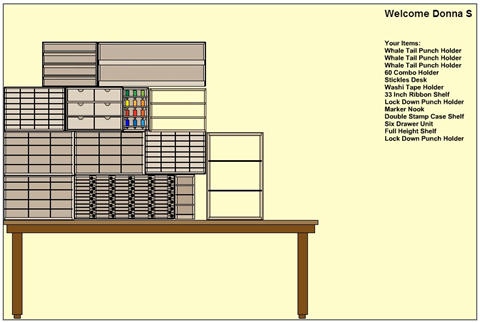
At the end of June, I started playing with the Studio Designer on the Stamp-N-Storage website. This allowed me to measure my space, add my table and any outlets, windows and other structures that are in the space. It then allowed me to select the pieces that I wanted to see if they fit in the space I have available.
 Source: Stamp-N-Storage Studio Designer
This also allowed me to stay within the budget that I set for myself!
Since one of my goals was to create a more cohesive finished space, I added some stamp storage, drawers for tools and ribbon storage as well!
I placed my order at the beginning of July and about half of the pieces arrived in less than a week. The rest just arrived a couple of days ago. I managed to get a few pieces painted before I could wait to fit them together and see what they looked like. Once I get more spray paint and the weather cooperates, I’ll get the rest of the pieces set up and have my table space completed!
Here is the start of my table space:
I can’t wait to get the rest of the pieces painted this week and get it all in place. It’s good sturdy construction created specifically for stamping storage. It already feels more cohesive and I love how it looks!
I was impressed with the helpful tools on the Stamp-N-Storage website. They have several videos giving advice on creating your perfect space. They also have several perfect spaces that they have featured in videos. They also give great advice on figuring out what your organization style is. (For example, I’m not a cabinet organizer. Once an item is placed in a cabinet and the door closes, I forget all about it. It’s placed in the storage abyss that is the equivalent of Warehouse 13!)
These pieces can also be mounted on the wall. I have no small children around and I’m generally the only one that uses this room, so I’m not too worried about it toppling over. I will add some braces to the backs to hold the pieces together and to attach them to the wall once I’ve decided exactly how I want them arranged on my table. The beauty of this system is that I can rearrange it until I have it exactly like I want it. I am really a function over form person!
Thanks for stopping by!


What kind of paint did you use to paint your
Ink storage container? Did you spray paint your unit?
I used spray paint for that. It actually worked pretty well, but the wood really soaked up the paint. It needs at least 2 coats of paint.